

Today, we’ll be walking you through the process of how to choose mountain biking shoes, so pay close attention. Cycling off-road isn’t exactly a smooth ride, which is why you’ll want shoes that make you feel safe and secure. Mountain bike shoes are quite distinct compared to road cycling shoes, which you can probably tell by its sole and upper. The best mountain bike shoes have tough uppers to withstand more abuse, and the sole should consist of hard-wearing lugs that allow you to walk easily while remaining stiff enough for cycling efficiency. A number of other factors you’ll want to take into account include type of sole, closure system, personalized features, and finding the right fit. That’s clearly not enough detail though. So, here is our complete guide on how to choose mountain biking shoes.
How to Choose Mountain Biking Shoes Infographic
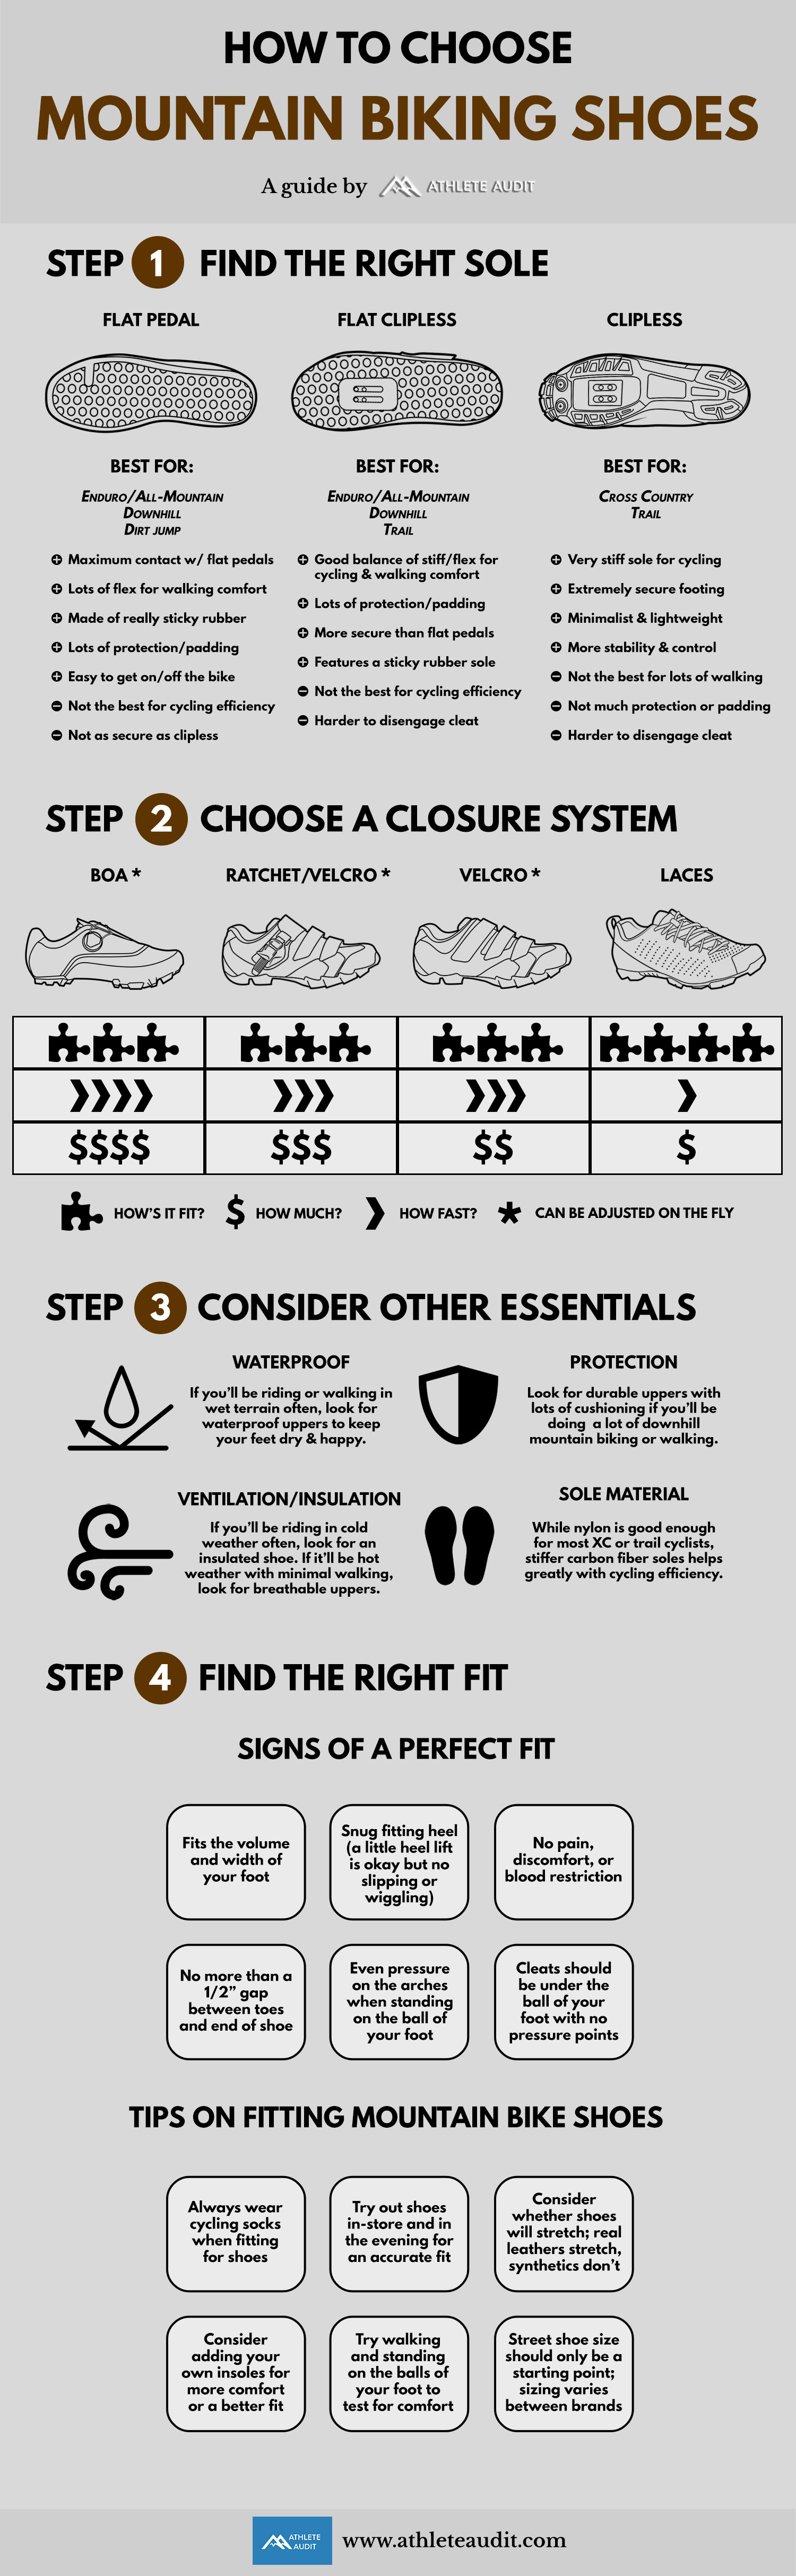
Share This Guide On Your Site
How to Choose Mountain Biking Shoes: In-Depth
Step 1: Find the Right Sole
When first learning how to choose mountain biking shoes, you’ll want to know about the different types of soles. Shoes built for off-road and mountain biking come in one of three forms: flat pedal, flat clipless, or clipless shoes. Depending on the type of biking you do, you’ll have to choose accordingly. Here are the main differences:
Flat
Best For: Enduro/AM, Downhill, Dirt jump
A flat pedal shoe will have a completely flat outsole made of grippy rubber to provide maximum contact with flat pedals. Built primarily for downhill biking and when you need the advantage of not being clipped into your pedals for easy on and off. They are usually quite flexible to provide lots of comfort when walking. Although they offer lots of protection and padding for the adrenaline junky, they don’t provide amazing cycling efficiency and are not as secure as clipless shoes. They are also generally heavier.
Flat Clipless
Best For: Enduro/AM, Downhill, Trail
Flat clipless shoes are built very similar to a flat pedal shoe, but they also have a cleat mount for clipping into your pedals. This provides added security when pedaling. With lots of protection, padding, a sticky rubber sole, and a good amount of flex for walking comfort, flat clipless shoes are definitely the most versatile of the bunch. The downsides, however, are that they don’t excel at anything specific like flat pedal or clipless shoes do. Getting used to clipless shoes also takes time to learn.
Clipless
Best For: Cross country, Trail
Last but not least are clipless shoes. Clipless biking shoes come with a 2-hole mount to attach your cleats to, which allows you to use either SPD, Crank Brothers, or Speedplay pedals. Being clipped into your pedals provides maximum efficiency when pedaling, which is great for when you don’t need to jump off your bike often (long distance cycling). A very stiff sole and a minimalist/lightweight design make them the perfect shoe for cross country or trail riding. Although they offer more stability and control, this comes at the price of not having much protection, padding, or walking comfort.

Step 2: Choose a Closure System
Next thing you’ll want to look at when learning how to choose mountain biking shoes is the closure system. The best closure system for you will be one that meets your preferences and type of riding you like to do. Your choices include velcro, ratchet/velcro combo, laces, and BOA lacing.
Velcro
Good ol’ reliable velcro. Although you usually want to avoid wearing velcro shoes in fear of looking like a grandpa, it’s seen as perfectly okay if it’s a mountain bike shoe. Often featuring two or three straps to lock down the ankle and forefoot, they are relatively inexpensive and quick to fasten, making them one of the most popular choices.
Ratchet/velcro
A ratchet and velcro combination is the next most popular option. Along with straps to secure the midfoot and forefoot, there is a ratchet system around the ankle to provide a secure fit. Offering a slightly quicker and better fit, they usually don’t cost that much more than regular velcro shoes.
Laces
Traditional lacing offers the most customization when it comes to adjusting fit, making them a good choice for the meticulous. Often the least expensive option, you’ll want to make sure laces are tucked away when biking to prevent them from getting caught in the chain/crank. The biggest downside to traditional laces is that they can’t be adjusted on the fly, while all the other closure systems can.
BOA
Some competitive mountain biking shoes use BOA lacing as well, which is an extremely quick way to tighten your shoes with the twist of a dial and loosening with the push of a button. Although really quick to use, BOA shoes are often the most expensive. And if they need to be replaced because the wire lacing broke, don’t expect it to be cheap or easy.

Step 3: Consider Other Essentials
Waterproof
If you’ll be riding or walking in wet terrain/weather often, look for waterproof uppers such as Gore-tex or a waterproof membrane to keep your feet dry and happy. Also, you’ll want to make sure there are no ventilation holes or mesh panels that can allow water to seep in.
Protection
Look for durable uppers with lots of cushioning if you’ll be doing a lot of downhill mountain biking or walking. As we’ve mentioned already, flat pedal or flat clipless shoes offer the most protection for those who are cruising for a bruising.
Ventilation/Insulation
If you’ll be riding in cold weather often, look for an insulated shoe that can keep your feet warm. This often means a liner that can help retain heat. If it’ll be hot weather you’re often in with minimal walking, look for breathable uppers instead.
Sole Material
Now, there needs to be a combination of stiffness and flex in a pair of mountain bike shoes. A stiffer sole allows you to pedal more effectively. A sole that flexes more will allows you to walk more comfortably. However, having more in one category will result in less of the other. In other words, more stiffness equates to less flex. More flex equates to less stiffness. So, you’ll have to decide what type of mountain biking you’ll be doing. If you’ll be staying on your bike the majority of the time, you’ll want a stiffer sole like carbon fiber soles with less flex. If you’ll be getting off often to walk up hills and through rugged terrain, look for a more flexible sole.
Step 4: Find the Right Fit
Against many popular beliefs, mountain bike shoes don’t have to fit tightly in order to perform effectively. If you’re really serious about learning how to choose mountain biking shoes and finding the perfect fit, you’ll want to find your European sizing first as it’s more accurate than US sizes.
Signs of a Perfect Fit
- Fits the volume and width of your foot. Note that volume and width are not the same thing
- A snug fitting heel. A little heel lift is okay but no slipping or wiggling
- No pain, discomfort, or blood restriction. Any irritation will be felt a lot more when biking
- No more than a half inch gap between the toes and end of the shoe
- Even pressure on the arches when standing on the ball of your foot
- The cleat mount should be under the ball of your foot with no pressure points
Tips on Fitting Mountain Bike Shoes
- Always wear cycling socks when fitting for shoes
- Try out shoes in-store and in the evening for an accurate fit
- Consider whether shoes will stretch and size accordingly. Real leathers stretch, synthetics don’t
- Consider adding your own insoles for more comfort or a better fit
- Try walking and standing on the balls of your foot to test for comfort
- Street shoe size should only be a starting point; sizing varies a lot between brands


